It’s that time of year again, the shops are filled with chocolate Easter Eggs galore which can only mean it’s time to celebrate Easter again. What better way to get the children in to the swing of it than with some Easter craft.
We are going to give you step by step instructions on how to make your very own Easter Bunny mask. It’s simple yet very effective and the children will love it.
Before we start let’s make sure we have all the supplies we need to make our Easter Bunny mask.
You will need:
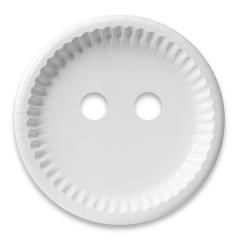
- A small paper plate
- Some pink card
- Pair of scissors
- Some elastic
- Craft glue
- Some white card
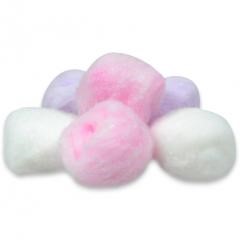
- A Large fawn pompom for your bunny nose
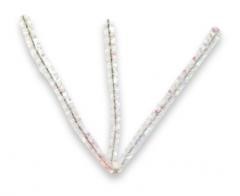
- 3 white chenille sticks
- A pink pen or crayon
Before we begin be sure you put on your apron so you don’t get messy.
Right lets hop to it.
Step 1:
So that we can judge where your eye holes need to go, hold the paper plate up to your face so someone can mark where your eye holes will be cut. You also need to mark where the holes will go on each side - this is where the elastic will go to hold your mask in place.
Once you have marked where you want your holes to be, you will need to cut the holes out using your scissors. Adults you may need to assist on this part for safety.
Step 2:
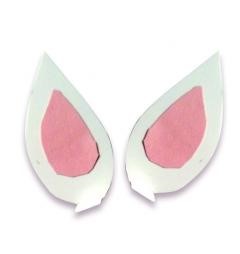
Bunny ears – to make your Easter Bunny ears firstly you will need to cut ear shapes out of the white card. Once you have these you will then need to cut smaller ear shapes out of the pink card.
Step 3:
Now you have cut out your ears you will need to glue the pink ear shape to the middle of the white ear shape. Do the same for both ears.
Once you have prepared your bunny ears you will need to attach them to the round paper plate. Using glue stick both of the ears to the top of the paper plate where you would like your ears to sit.
You now have your bunny face with your eyes and ears in place.
Step 4:
Now for the bunny’s whiskers! Get the 3 chenille sticks and bunch them together so that they all line up nicely. Find the middle point and twist round so that they are all stuck together.
Separate the ends so that they make a fan shape, these will be your bunny’s whiskers.
Next you need to glue them to the bunny’s face, below the eyes you have already cut out you need to glue the centre point down onto the paper plate.
Step 5:
Every bunny needs a fluffy nose – now you can glue your large fawn pompom on top of the whiskers at the centre point.
Using the pink pen you need to draw on your bunny’s mouth. Draw a short line down from the fluffy nose around 2cm long, then draw a curl on each side so that the bunny looks like she is smiling.
Your Easter Bunny face is now complete! Now before you can wear the mask there is just one more step…
Step 6: The big finale
Using the elastic that you have, loop each end into the holes you made on the side of your paper plate. Be careful as you need this to fit your head, you don’t want it too tight and you don’t want it too loose.
Adults you will need to help attach the elastic so the mask fits perfectly. Once you have found the perfect size you will need to tie a knot in each end of the elastic so it remains in place.
Your Easter Bunny mask is now ready to wear, so hop hop hop along and have some Easter fun.
We would love to see you Easter Bunny masks, post us your pictures on Facebook, or Tweet us on Twitter.
Our Gopak Tub Tables are great for arts and craft areas. They have easy clean surfaces with tubs placed in the centre, they are great for organising your arts and craft areas. Ideal for nurseries, pre-schools and reception areas.
There’s no harm in having a little organisation when it comes to arts and craft.
For more information visit Early Learning Furniture or call us on 01733 5111
Permalink:
https://www.earlylearningfurniture.co.uk/blog/get-crafty-this-easter-with-early-learning-furniture.aspx